Thursday, July 7, 2022

5 मिनट में फ्री में पैनकार्ड बनाए


फ्री में पैन कार्ड बनाएं

यदि आप फ्री में पैनकार्ड बनाना चाहते है तो इसका भी बहुत ही आसान तरीका है, जिसकी मदद से आप फ्री में ऑनलाइन इंस्टेंट ई-पैनकार्ड बना सकते है। वो भी सिर्फ आधार कार्ड की मदद से लेकिन इसके लिए आपके आधार कार्ड से मोबाइल नंबर लिंक होना चाहिए।

ऑनलाइन फ्री में ई – पैनकार्ड बनाने का स्टेप by स्टेप प्रोसेस कुछ इस प्रकार है इस तरीके को की मदद से आप भी अपना मात्र 5 मिनट में अपना e-PAN Card बना सकते है।

STEP: 1 इसके लिए सबसे पहले आपको इनकम टैक्स की वेबसाइट https://www.incometax.gov.in/iec/foportal पर जाना है।

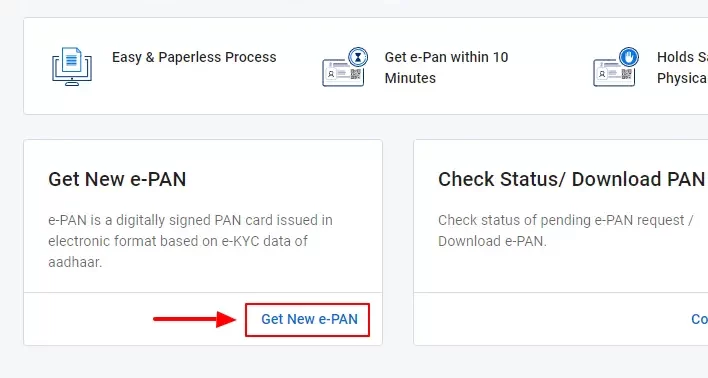
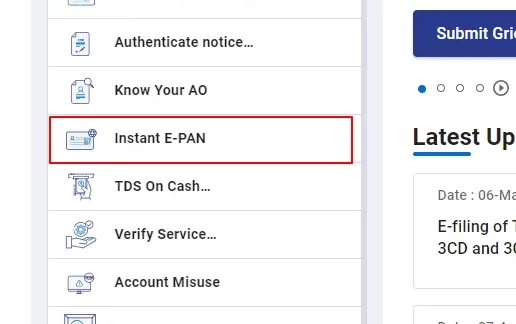
STEP: 2 अब आपको इस पोर्टल पर Instant e- PAN का विकल्प मिलेगा उस पर क्लिक करना है। इसके बाद Get New e-PAN पर क्लिक करना है।

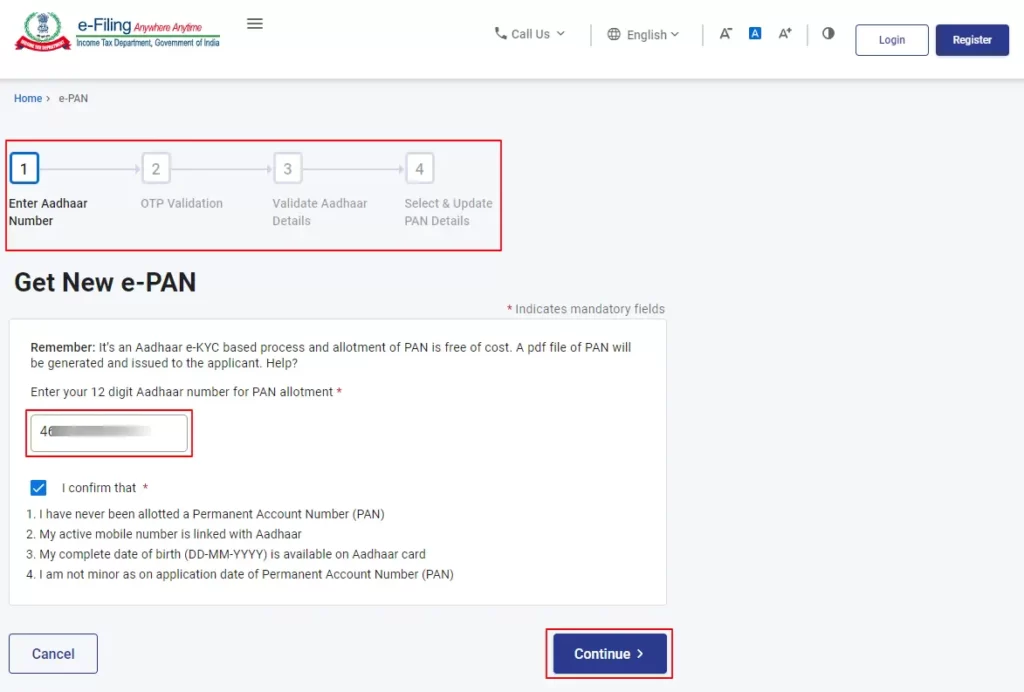
STEP: 3 इसके बाद Aadhaar e-KYC based process से पैनकार्ड बनाने के लिए आपको अपने आधार कार्ड नंबर एंटर करने है। Continue के बटन पर क्लिक करना है , (ध्यान रहे आपके आधार कार्ड से मोबाइल नंबर लिंक होना चाहिए। ) इसके साथ ही इन बातों का भी ध्यान रखें।

  1. आपको कभी भी स्थायी खाता संख्या (पैन) आवंटित नहीं किया गया हो।
  2. आपका सक्रिय मोबाइल नंबर आधार से जुड़ा हुआ हो।
  3. आपकी पूरी जन्म तिथि (DD-MM-YYYY) आधार कार्ड पर उपलब्ध होनी चाहिए।
  4. आवेदनकर्त्ता स्थायी खाता संख्या (पैन) की आवेदन तिथि के अनुसार नाबालिग नहीं होना चाहिए।
आधार कार्ड से पैन कार्ड कैसे बनाएं

STEP: 4 अब आपके आधार से जुड़े मोबाइल नंबर पर एक OTP आएगा उसे एंटर करना है। उसके बाद Continue के बटन पर क्लिक करना है।

STEP: 5 आधार e- KYC से वेरीफाई होने के बाद आपको आपकी पर्सनल डिटेल्स देखने को मिलेगी। इसके बाद आपको फिर से Continue के बटन पर क्लिक करना है।

How to Setup Samsung Galaxy A03-Core Android Phone-Click Here 

STEP: 6 इसके बाद Your request for e-PAN has been submitted लिखा हुआ आएगा।

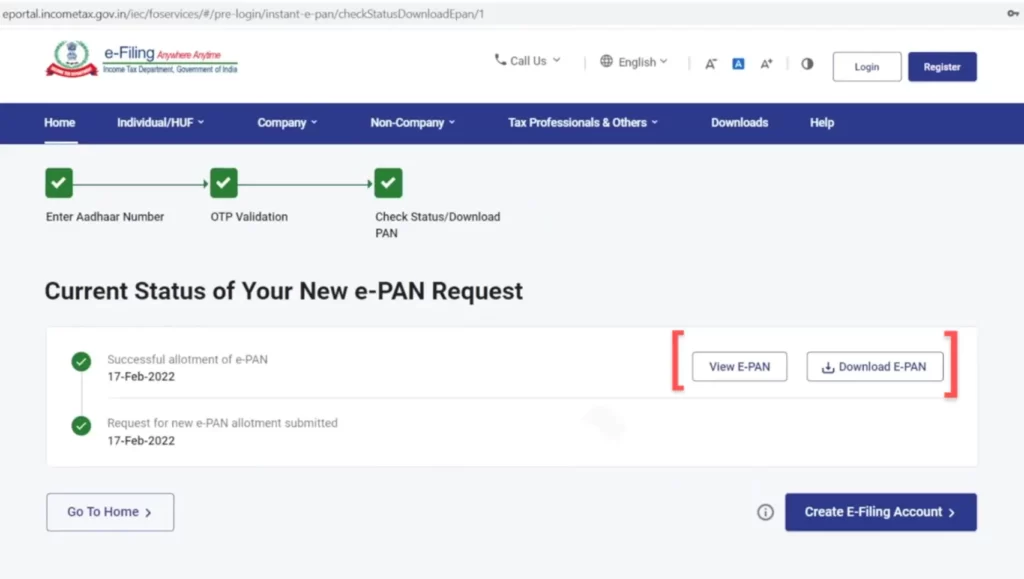
STEP: 7 अब फिर से https://www.incometax.gov.in/iec/foportal पर जाना है और Instant E-PAN पर क्लिक करना है। इसके बाद एक नया पेज खुलेगा इसमें आपको Check Status/ Download PAN पर क्लिक करके आधार नंबर एंटर करने हो और otp से वेरीफाई करना है। इसके बाद कुछ इस प्रकार से e-PAN देखने और डाउनलोड करने के विकल्प मिलेंगे।

efiling se pan card kaise banaye


मेरे फेसबुक पेज को लाइक करे और INSTAGRAM कर फॉलो करे
PLZ LIKE,SHARE COMMENT.................


Saturday, July 2, 2022

How to Fix a Slow Computers,System Hanging Problum

  Fix a Slow Computers,System Hanging Problem


धीमे कंप्यूटर को बार-बार चालू और बंद करने की तुलना में धीमे कंप्यूटर को ठीक करने के और भी कई तरीके हैं। और यदि हर बार जब आप एक से अधिक एप्लिकेशन खोलने का प्रयास करते हैं तो आपका कंप्यूटर मेल्टडाउन हो जाता है, तो आपको कुछ नई तरकीबें जानने की आवश्यकता हो सकती है।

Please Follow step by step................

1. Remove unnecessary files and photos

यह आपके कंप्यूटर पर संग्रहीत फ़ाइलों और तस्वीरों के माध्यम से कठिन हो सकता है, लेकिन जिन्हें अब आपको आवश्यकता नहीं है, उन्हें हटाकर, आप चीजों को गति दे सकते हैं और अपने कंप्यूटर को फ्रीज या क्रैश होने से बचा सकते हैं। स्काई ब्रॉडबैंड के प्रबंध निदेशक एम्बर पाइन कहते हैं, 'पुरानी तस्वीरों को हटाना, डेस्कटॉप पर फाइलों को हटाना या बड़ी फाइलों को ऑनलाइन स्टोरेज पर अपलोड करना, आपके तकनीकी काम को लंबे समय तक तेजी से काम करने में मदद करने के छोटे और स्मार्ट तरीके हैं। 'इसी तरह अपने हैंडसेट और टैबलेट के साथ, आप उन ऐप्स को अनइंस्टॉल कर सकते हैं जिनका उपयोग आप स्थान खाली करने के लिए नहीं करते हैं।' 

2. Delete your recycle bin and clear temporary files 


Delete temp ,prefetch file on your Computer.

3. Add more RAM

यदि आपका कंप्यूटर Error Massage दिखा रहा है और फ़ाइलों को लोड होने में Time लग रहI है, तो आपको अधिक मेमोरी (RAM) जोड़ने की आवश्यकता हो सकती है। याद रखें कि यह आपकी हार्ड ड्राइव पर समग्र संग्रहण स्थान से अलग है, लेकिन अधिक RAM जोड़ने से आपका कंप्यूटर बेहतर ढंग से मल्टीटास्क करने में सक्षम होगा।


यदि आप नियमित रूप से एक साथ सॉफ्टवेयर चलाते हैं, तो अधिक रैम जोड़ने से मदद मिल सकती है। 'पहले जांचें कि आपके कंप्यूटर पर वर्तमान में कितनी रैम है, और यह भी याद रखें कि अधिकतम मात्रा में रैम है जिसे पीसी संभाल सकता है।


'आमतौर पर, आप HP, Lenovo और Toshiba सहित निर्माताओं से 4GB, 8GB, 16GB और 32GB विकल्पों में से चुन सकते हैं - ये सभी सिस्टम के प्रदर्शन को बढ़ाने, तेज स्टार्ट-अप को सक्षम करने, कम देरी और ऐप्स के बीच आसान स्विचिंग के लागत प्रभावी तरीके हैं। ।
 

4. Install anti-virus software 

यदि आपका पीसी मैलवेयर से संक्रमित हो जाता है तो यह सामान्य से धीमा हो सकता है। आपके पास अनपेक्षित पॉप-अप संदेश, एक शोर वाला कंप्यूटर और प्रोग्राम भी हो सकते हैं जो स्वचालित रूप से स्वचालित रूप से प्रारंभ हो जाते हैं। हालाँकि, मैलवेयर हमेशा ध्यान देने योग्य नहीं होगा।


Microsoft सलाह देता है कि वायरस और दुर्भावनापूर्ण सॉफ़्टवेयर को संभालने का सबसे अच्छा तरीका एंटी-मैलवेयर और एंटी-वायरस सॉफ़्टवेयर चलाना और उसे अद्यतित रखना है। उदाहरण के लिए, विंडोज 11 में विंडोज सिक्योरिटी शामिल है, जो आपके पीसी को वायरस या अन्य दुर्भावनापूर्ण सॉफ़्टवेयर के लिए स्कैन करेगा।

5. Disable start up programs 

आपके कंप्यूटर पर कुछ प्रोग्राम विंडोज़ के स्वचालित रूप से प्रारंभ होने के लिए सेट होते हैं। यह बताना हमेशा आसान नहीं होता कि कौन से खुले हैं, लेकिन एक ही समय में बहुत अधिक दौड़ने से चीजें धीमी हो सकती हैं।
आप यह सुनिश्चित करने के लिए स्टार्टअप प्रोग्राम को अक्षम कर सकते हैं कि वे स्वचालित रूप से प्रारंभ न हों, लेकिन आपको इसे अपने कंप्यूटर की सेटिंग पर मैन्युअल रूप से करना होगा।

6. Upgrade your PC’s storage device from a hard disk to an SSD

 यदि आपका कंप्यूटर स्पष्ट रूप से धीमा है और क्रैश होता रहता है और आप एक नया खरीदने के लिए तैयार नहीं हैं, तो अपने पीसी के स्टोरेज डिवाइस को हार्ड डिस्क से SSD में अपडेट करने का प्रयास करें। इसके लिए आपके पीसी को खोलने की आवश्यकता होगी, इसलिए यदि आप आश्वस्त महसूस नहीं करते हैं तो किसी तकनीशियन से इसे आपके लिए करने के लिए कहें। कई SSD डिस्क क्लोनिंग सॉफ़्टवेयर के साथ बेचे जाते हैं ताकि आप अपने पूरे कंप्यूटर के ऑपरेटिंग सिस्टम का उपयोग करने से पहले उसे कॉपी कर सकें।

एसएसडी पर स्विच करने से पढ़ने और लिखने की गति तेज हो जाएगी। 'यह बड़ी फ़ाइलों को खोलने में लगने वाले समय को भी कम करेगा और कंप्यूटर के बूट समय में भी सुधार करेगा।'

पुराने डेस्कटॉप या लैपटॉप कंप्यूटर के लिए, आपको किंग्स्टन के A400 SSD जैसे SATA SSD की आवश्यकता होगी। M.2 स्लॉट वाले नए कंप्यूटर में, किंग्स्टन NV1 SSD आज़माएं।


कृपया लाइक करें कमेंट करें और सभी दोस्तों को शेयर करें
मुझे कमेंट करें आपको हमारे नोट्स कैसे लग रहे हैं। नोट्स रिलेटेड कोई भी पूछताछ के लिए हमारी ईमेल आईडी पर मेल करे ..
मुझे इंस्टाग्राम और फेसबुक पर फॉलो करे

समर्थन करने के लिए धन्यवाद 


My Instagram Id click here- INSTAGRAM

My Facebook Page click here- FACEBOOK PAGE

MY MOBILE NUMBER - 9990080678
 Email Id:- govind9990080678@gmail.com


Input And Output Devices Of Computer


Input And Output Devices Of Computer

इनपुट और आउटपुट डिवाइस कंप्यूटर का एक प्रमुख हिस्सा हैं। वे एक प्रकार के हार्डवेयर डिवाइस हैं जो कंप्यूटर सिस्टम को बनाते हैं। ये बाहरी मदद से सिस्टम को ठीक से काम करने की अनुमति देते हैं। वे दोनों डेटा से निपटते हैं लेकिन अलग-अलग तरीकों से।

इनपुट उपयोगकर्ता को डेटा भेजने की अनुमति देता है जबकि आउटपुट डेटा से संबंधित कार्य को पूरा करता है। ये सभी सहायक उपकरण हैं जो डिवाइस से जुड़ते हैं और उसके अनुसार सभी कार्यों को पूरा करते हैं। कीबोर्ड, माउस, स्कैनर आदि कुछ इनपुट डिवाइस हैं जबकि प्रिंटर, मॉनिटर, हेडफोन आदि कुछ आउटपुट डिवाइस हैं।
Difference Between 32-Bit and 64-Bit Operating Systems
हार्डवेयर सिस्टम का एक अन्य महत्वपूर्ण तत्व कंप्यूटर मेमोरी है। यह वह जगह है जहां सभी डेटा अस्थायी या स्थायी रूप से चला जाता है। यह मुख्य रूप से दो प्रकार की होती है- वोलेटाइल मेमोरी और नॉनवोलेटाइल मेमोरी। वोलेटाइल मेमोरी को स्टैटिक रैम या डायनेमिक रैम जैसी सूचनाओं को कार्य करने और स्टोर करने की शक्ति की आवश्यकता होती है।

इंटरफ़ेस के संदर्भ में गतिशील एक को संभालना जटिल है और इस प्रकार नियमित रूप से ताज़ा चक्र की आवश्यकता होती है। इस बीच, SRAM का इंटरफ़ेस बेहतर है लेकिन इसके लिए प्रति bit 6 ट्रांजिस्टर की आवश्यकता होती है। नॉन वोलेटाइल मेमोरी को जानकारी को बनाए रखने के लिए पावर की आवश्यकता नहीं होती है और इसके कुछ उदाहरण हैं - ROM, फ्लैश मेमोरी, ऑप्टिकल डिस्क आदि। 

Input Devices of Computer

जैसा कि ऊपर उल्लेख किया गया है, इनपुट डिवाइस उपयोगकर्ताओं को एक निश्चित कार्य करने के लिए कंप्यूटर को सिग्नल भेजने की अनुमति देते हैं। इस छोर पर रिसीवर सेंट्रल प्रोसेसिंग यूनिट (CPU) है जो तब आउटपुट डिवाइस को सिग्नल भेजता है। इनपुट डिवाइस आगे दृश्य या श्रव्य, असतत या निरंतर जैसे तौर-तरीकों के अनुसार वर्गीकृत होते हैं, और क्या यह प्रत्यक्ष या अप्रत्यक्ष है।
How to Fix Error “Netio.sys” Blue Screen Errors on Windows 10
कुछ वर्गीकरण हैं .......

1. Keyboard Devices

  • Keyer
  • Keyboard
  • Lighted Program Function Keyboard (LPFK)

2. Pointing Devices

  • A mouse sitting on a desk.
  • A computer mouse
  • 3D mice
  • Joysticks
  • Pointing sticks

3. Composite Devices

  • Wii Remote
  • Wii Remote with attached strap

4. Game controller

  • Gamepad (or joypad)
  • Paddle (game controller)
  • Jog dial/shuttle (or knob)
  • Wii Remote

5. Visual Devices

  • Digital camera
  • Digital camcorder
  • Portable media player
  • Webcam
  • Microsoft Kinect Sensor
  • Image scanner
  • Fingerprint scanner
  • Barcode reader
  • 3D scanner
  • Laser rangefinder
  • Eye gaze tracker
  • Medical Imaging
  • Computed tomography
  • Magnetic resonance imaging
  • Positron emission tomography
  • Medical ultrasonography
    how to Block Site in Sophos Firewall

6. Audio Input Devices 

        Microphones 

        MIDI keyboard or another digital musical instrument


Output Devices of Computer

आउटपुट डिवाइस इनपुट डिवाइस द्वारा डेटा प्रोसेसिंग के बाद परिणाम प्रदर्शित करने का ध्यान रखते हैं। यह छवि, ग्राफिक, टेक्स्ट या ऑडियो रूप में हो सकता है। ये डिवाइस डिस्प्ले पर विजुअल एलिमेंट दिखाते हैं। स्क्रीन पर सूचना सॉफ्ट कॉपी है और कुछ महत्वपूर्ण आउटपुट डिवाइस हैं -

1. Monitors


2. Printers

3. Speakers

4. Projector

5. Plotter

6. Braille Reader

7. Television

8. Video Card

9.Global Positioning System

10. Headphones
How to Setup Samsung Galaxy A03-Core Android Phone

Both Input and Output Devices of Computer

There are many devices that have characteristics of both input and output devices. They can receive data as well as give out a result becoming useful for both purposes.

Some of them are – 

1. USB Drive – It is a detachable device which can receive data from any computer as well as send out data to other devices. 


2. Modems – It is responsible for transmitting data from one device to another using telephonic lines. 


  3. CD and DVD Drives – Saves data from the computer in the given format and can also send out data to other devices with disk space. 

 4. Headset – It has a speaker which is an output device and a microphone which is an input device. 

              5. Facsimile – This is a fax machine with scanner being an input device and printer being the output device. 

How to create a Windows Seqrite Client packager in Server

Difference between Input Devices and Output Devices

INPUT DEVICE OUTPUT DEVICE
Accepts user data Reflects user data
The user commands them Processor commands them
Conversion of friendly instruction into a machine friendly Conversion of machine’s instructions to user needs
Sends data to the processor for execution Sends processed data back to the user.
Helps computer in receiving data Helps computer in displaying data
Complex design structure Less complex design structure 
Example – Keyboard, Image Scanner, etc. Ex: Monitor, Printers, etc.


कृपया लाइक करें कमेंट करें और सभी दोस्तों को शेयर करें
मुझे कमेंट करें आपको हमारे नोट्स कैसे लग रहे हैं। नोट्स रिलेटेड कोई भी पूछताछ के लिए हमारी ईमेल आईडी पर मेल करे ..
मुझे इंस्टाग्राम और फेसबुक पर फॉलो करे

समर्थन करने के लिए धन्यवाद 


My Instagram Id click here- INSTAGRAM

My Facebook Page click here- FACEBOOK PAGE

MY MOBILE NUMBER - 9990080678


Difference Between 32-Bit and 64-Bit Operating Systems


32-Bit Vs. 64-Bit Operating Systems: What is the Difference Between 32-Bit and 64-Bit Operating Systems

There are two types of processors existing in computing- the 32-bit and 64-bit processors. The type of processor used in an operating system (OS) tells us how much memory it can access from the CPU register. There is a range of difference between 32-bit and 64-bit operating systems. 


For example,

how to Block Site in Sophos Firewall 

  • 32-bit system – It can ideally access about 232 memory addresses. It is equal to 4 GB (gigabytes) of physical memory or RAM. It can also access more than 4 GB of physical memory, but not very efficiently.
  • 64-bit system – It can ideally access about 264 memory addresses. It is equal to 18 Quintillion Bytes of physical memory or RAM. In short, it can handle any amount of memory that is greater than 4 GB easily.
    How to create a Windows Seqrite Client packager in Server

    Difference Between 32-Bit and 64-Bit Operating Systems

    Parameter

    32-Bit OS

    64-Bit OS

    Handling of Data and Storage As its name suggests, the 32 bit OS can store and handle lesser data than the 64 bit OS. More specifically, it addresses a maximum of 4,294,967,296 bytes (4 GB) of RAM. The 64 bit OS, on the other hand, can handle more data than the 32 bit OS. It means that it can address a total of 264 memory addresses, which is 18-Quintillion GB of RAM.
    Compatibility of System A 32-bit processor system could properly run a 32-bit OS, but it cannot run the 64-bit OS at its full capability. A 64-bit processor system can run either a 32-bit or 64-bit version of an installed operating system (OS).
    Application Support The 64-bit programs and applications won’t work. The 32-bit programs and applications will work with no hassle.
    Performance The factor of performance in a 32-bit processor is less efficient than the 64-bit processor. It exhibits a higher performance than the 32-bit processor.
    Addressable Space It has an addressable space of 4 GB. These have an addressable space of 16 GB.
    OS Support It needs a 32-bit operating system. This one can run on both 32-bit and the 64-bit operating system.
    Multi-Tasking Support The 32-bit system is not a very ideal option for multi-tasking and stress-testing. For multitasking and stress testing, the 64-bit processor is better. It also works well for the execution of other heavy applications.
    OS and CPU Requirements The 32-bit applications and operating systems require 32-bit CPUs. The 64-bit operating system needs a 64-bit CPU, and the 64-bit applications require a 64-bit CPU and OS.
    Systems Available These support Windows 7, Windows XP, Windows Vista, Windows 8, and Linux. These support Windows XP Professional, Windows 7, Windows 8, Windows 10, Windows Vista, Linux, and Mac OS X.
    Limits in Memory A 32-bit system has a limit of 32 bit Windows 3.2 GB of RAM. The limit in its addressable space doesn’t allow you to use the entire physical memory space of 4GB. A 64-bit system enables its users to store up to 17 Billion GB of RAM.

    Keep learning and stay tuned to get the latest updates on GATE Exam along with Eligibility Criteria, GATE Application Form, Syllabus, GATE Cut off, Previous Year Question Paper, and more.


    What is a 32-Bit Operating System?

    It is a CPU architecture type that holds the capacity to transfer 32 bits of data. It refers to the amount of data and information that your CPU can easily process when performing an operation. A majority of the computers produced in the early 2000s and 1990s were 32-bit machines.

    One bit in the register can typically reference an individual byte. Thus, the 32-bit system is capable of addressing about 4,294,967,296 bytes (4 GB) of RAM. Its actual limit is less than 3.5 GB (usually) because a portion of the register stores various other temporary values apart from the memory addresses.

    How to Setup Samsung Galaxy A03-Core Android Phone 

    What Is a 64-Bit Operating System?

    The 64-bit microprocessor allows computer systems to process information, data, and memory addresses represented by 64 bits. Such a system can typically reference 16 exabytes (17,179,869,184 GB), or 18,446,744,073,709,551,616 bytes of memory.

    It is numerous million times more than what an average workstation would require to access. A 64-bit system (a computer with a 64-bit processor) has the capacity to access more than 4 GB of RAM. It means that if a computer has 8 GB of RAM, it requires a 64-bit processor. Or else, the CPU will be inaccessible to at least 4 GB of the memory.


    My Second Blog Site- Click Here 

    please like Comment and share to all friends
    comment mai bataye aapko hamara notes aapko kaisa laga.notes releted koi bhi inquiry ke liye hamari email id par mail kare..
    Mujhe Instagram Aur Facebook par Follow Kare

    Thanks for Supporting


    My Instagram Id click here- INSTAGRAM

    My Facebook Page click here- FACEBOOK PAGE

    MY MOBILE NUMBER - 9990080678
     
    My Email Id :-  govind9990080678@gmail.com


How to Fix Error “Netio.sys” Blue Screen Errors on Windows 10

  Fix Error “Netio.sys” Blue Screen Errors on Windows 10

कई तरीके आपके Windows 10 सिस्टम को BSOD (Blue Screen Of Dead) Error की ओर ले जाते हैं, जिनमें से एक NETIO.SYS Error है, जो काफी सामान्य है। इस लेख में, हम इस Error को और अधिक विस्तार से देखेंगे और सबसे महत्वपूर्ण बात यह है कि कैसे आप इसे ठीक कर सकते हैं।

"NETIO.SYS" क्या है? NETIO.SYS Error एक BSoD (ब्लू स्क्रीन ऑफ़ डेथ) प्रकार की Error है। यह नीली स्क्रीन पर कई अलग-अलग त्रुटि संदेशों के साथ दिखाई देता है, जिससे आपका सिस्टम क्रैश और रीबूट हो जाता है। यहां कुछ संदेश दिए गए हैं (जिन्हें स्टॉप कोड भी कहा जाता है) जो आपको NETIO.SYS Error से निपटने के दौरान मिल सकते हैं।

  • PAGE_FAULT_IN_NONPAGED_AREA
  • KMODE_EXCEPTION_NOT_HANDLED
  • SYSTEM_SERVICE_EXCEPTION
  • DRIVER_IRQL_NOT_LESS_OR_EQUAL
  • SYSTEM_THREAD_EXCEPTION_NOT_HANDLED 
  •  
  • "ब्लू स्क्रीन" त्रुटि क्या है? 
  • जब आपके सिस्टम में घातक Error होता है, तो आपको "ब्लू स्क्रीन" Error दिखाई देता है । Microsoft Windows उपयोगकर्ताओं द्वारा ब्लू स्क्रीन ऑफ़ डेथ का उपनाम दिया गया, यह एक सामान्य समस्या है जो आपके सिस्टम को तुरंत रोक देती है, और इसे रीबूट करने के लिए मजबूर करती है। यह निस्संदेह एक अप्रत्याशित Error है, लेकिन इसका मतलब यह नहीं है कि आप यह सुनिश्चित करने के लिए कुछ भी नहीं कर सकते हैं कि यह एक ही कारण से दो बार न हो। अधिकांश ब्लू स्क्रीन Errors सिस्टम से संबंधित समस्याओं से जुड़ी होती हैं, जिसके कारण विंडोज को "STOP" त्रुटि प्राप्त होती है, जिससे सिस्टम क्रैश हो जाता है। यह आगे की चेतावनियों के बिना होता है, जिसका अर्थ है कि काम खो सकता है, और फाइलें कभी-कभी दूषित हो सकती हैं। बार-बार बचत करना सुनिश्चित करें!

    "NETIO.SYS" त्रुटि का क्या कारण है? 
  • जहां तक ​​लगभग हर ब्लू स्क्रीन प्रकार की Error का संबंध है, NETIO.SYS के भी कई कारण हो सकते हैं। हम अनुशंसा करते हैं कि सभी संभावित समाधानों पर एक नज़र डालें और उस समाधान से शुरू करें जिस पर आपको संदेह है कि आपकी समस्या उत्पन्न हुई है। उदाहरण के लिए, NETIO.SYS आमतौर पर नेटवर्क ड्राइवरों से जुड़ा होता है - यदि आप जानते हैं कि आपकी उपेक्षा की गई थी, तो अपने नेटवर्क ड्राइवर से संबंधित सुधार के साथ शुरू करें। अन्य कारण भ्रष्ट सॉफ़्टवेयर जैसे सरल या खराब कॉन्फ़िगर किए गए सिस्टम जैसी जटिल चीज़ें हो सकते हैं। भले ही आपकी समस्या किसी भी कारण से उत्पन्न हो, आपको सबसे अधिक संभावना है कि आप यहां समाधान ढूंढ़ने जा रहे हैं। "NETIO.SYS" को कैसे ठीक करें जैसा कि ऊपर बताया गया है, इस Error के कई कारण हैं, जिसका स्वाभाविक रूप से मतलब है कि कई संभावित समाधान हो सकते हैं। इस पृष्ठ पर, आप "NETIO.SYS" ब्लू स्क्रीन त्रुटि से छुटकारा पाने का हर तरीका ढूंढ सकते हैं, और सामान्य समस्या निवारण युक्तियाँ यह सुनिश्चित करने के लिए कि यह फिर कभी वापस न आए।    
  •  

Thursday, June 30, 2022

how to Block Site in Sophos Firewall


 Sophos Official Site


Step 1. Create a Custom Category with the keyword list

  1. Navigate to Protect | Web | Categories and click the Add button.
  2. Specify a NameClassification and add the keyword(s). I suggest adding some basic variations such as plurals and common language variations used in your organization.

Step 2. Create a Custom User Activity group

  1. Navigate to Protect | Web | User Activities and click the Add button.
  2. Specify a Name and add the custom Category created in the previous step.

Step 3. Create a new Web Policy

  1. Navigate to Protect | Web | Policies, click the Add Policy button and give the policy a name.
  2. Click the Add rule button and add a Block HTTP rule for the Custom User Activity created earlier
  3. Change the Default action rule to Allow HTTP (we will restrict this in the firewall rules)
  4. Since we are going to apply this rule to search engines, it is a good place to check Enforce Safe Search as an Additional Setting of the web policy.

Step 4. Create a Firewall Rule

To make all of this work we need a Firewall rule that matches Google searches and then applies our web policy.

  1. Navigate to Protect | Rules and Policies | Firewall Rules and click the Add Firewall Rule button.
  2. In the Destination Networks section, search for and add the Google domains.
  3. Under Security Features | Web Filtering section, select your Restricted Search policy that you created earlier as the Web policy.
  4. Check Block QUIC protocol (Why? See our article on How Google’s QUIC Protocol Impacts Network Security and Reporting).
  5. Check Use web proxy instead of DPI Engine (You need to use the Web proxy method since enforcing SafeSearch is not possible using the DPI engine).
  6. Check Decrypt HTTPS during web proxy filtering.

Testing

Now that you’ve created a Custom Category containing your keywords, used it in Web Policy that also enforces SafeSearch, and applied that policy to a firewall rule that kicks in for Google domains, it is time to test!

Open Google in your favorite browser and search for “wallpaper”. You’ll see that you are blocked:

Search for something else such as ‘higher education’ and you will see that it is allowed.

Finally, search for home improvements/wall covering and you will notice when you click through to those sites, you will be allowed access to pages that contain the keyword ‘wallpaper’.

Monitoring Search Terms

The key to knowing what keywords to block is to keep an eye on the sort of searches being performed. Fastvue Sophos Reporter makes it easy to report on and be alerted to suspicious searches, or all searches used in your organization. Since most web journeys start with a search, it is a good indicator of what a user’s intended browsing is.

  1. In Fastvue Sophos Reporter, go to Reports | Overview Report | Internet Usage
  2. Select your desired date range and click Run Report (or Schedule Report)
  3. Go to the Safeguarding | Search Terms section. By default, this shows Suspicious Searches, but you can show all of them by clicking the All Searches button.


To get started with Sophos , download the free 30-day trial.

Conclusion

Blocking content using just ‘keywords’ on their own has some limitations in both application and practicality, but can be extremely useful in specific circumstances, such as blocking searches, when used correctly in combination with other Sophos XG filtering mechanisms.

You can now apply the above process with other keywords to prevent specific situations in your organization, such as searches for ‘VPNs’ or ‘Bypass firewall’ that could potentially result in those pesky students (or employees!) getting around your Sophos rules and policies altogether.

Let us know how you’re using keyword blocks in the comments!


My Second Blog Site- Click Here 

please like Comment and share to all friends
comment mai bataye aapko hamara notes aapko kaisa laga.notes releted koi bhi inquiry ke liye hamari email id par mail kare..
Mujhe Instagram Aur Facebook par Follow Kare

Thanks for Supporting


My Instagram Id click here- INSTAGRAM

My Facebook Page click here- FACEBOOK PAGE

MY MOBILE NUMBER - 9990080678
 
My Email Id :-  govind9990080678@gmail.com


Tuesday, June 28, 2022

How to Setup Samsung Galaxy A03-Core Android Phone

         Please follow Setup By Setup.............

  1. Ensure a 4G SIM is inserted in the device prior to powering on.
    4G Devices purchased from Verizon include a pre-installed 5G SIM card.

  2. If powered off, press and hold the
    Power button
    (right edge, below the Volume buttons) until the Samsung Galaxy screen appears then release.
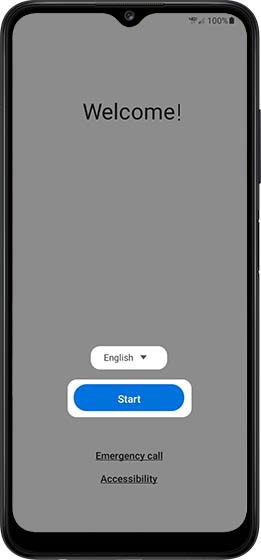
  3. Select the appropriate language then tap the
    Start
    .
    Let's go! screen
  4. To continue, select (check) the following then tap
    Next
    (lower-right):
    Review the info before continuing.
    Tap
    I have read and agree to all of the above
    to select all.
    Terms and Conditions screen
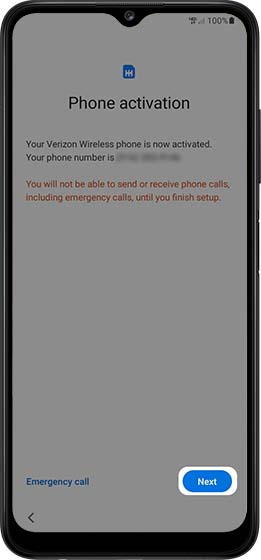
  5. From the 'Phone activation' screen, ensure the appropriate mobile number is listed then tap
    Next
    .
    If prompted, enter the account PIN then follow the onscreen prompts (see Account PIN FAQs for additional info).
    If activating a new phone, ensure the old phone is powered off.
    Phone activation screen
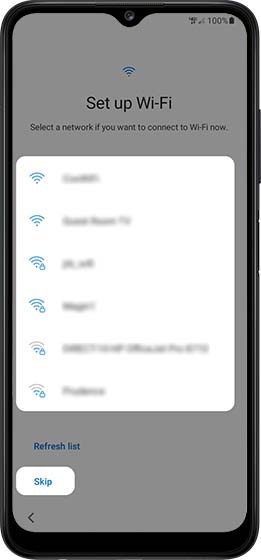
  6. From the 'Set up Wi-Fi' screen, select a network, enter the password when prompted then tap
    Next
    .
    If you choose 'Skip', you can add Wi-Fi networks after setup is complete.
    Set up Wi-Fi screen
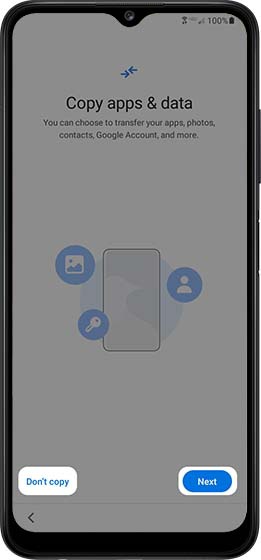
  7. From the 'Copy apps & data' screen, select the preferred option:
    • Next
    • Don't copy
      If troubleshooting, choose this option and don't restore the device until all testing has been completed.
    Copy apps & data
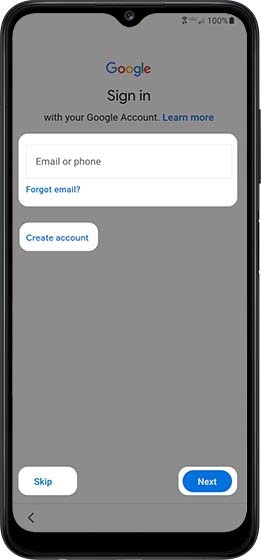
  8. From the 'Google Sign in' screen, sign in to your existing Google account or create a new one.
    If you choose 'Skip', you can add your Google account after setup is complete.
    Google sign-in screen
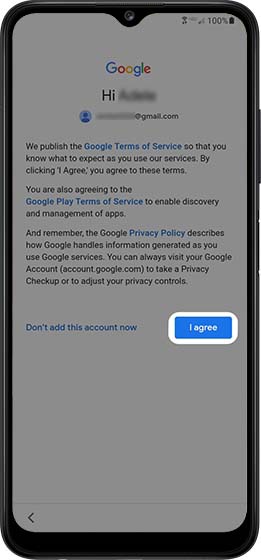
  9. Review the Google Terms of Service, Google Play Terms of Service, and Google Privacy Policy then tap
    I agree
    .
    Google T&C and Privacy Policy screen
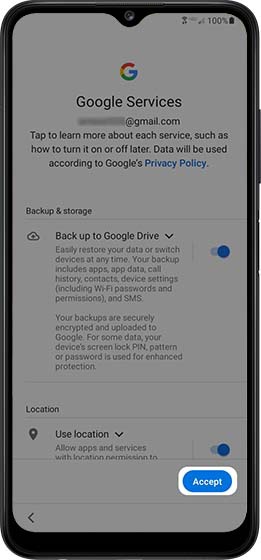
  10. From the 'Google Services' screen, tap the applicable switch(es) to turn on Switch on or off Switch off then tap
    Accept
    (lower-right).
    If necessary, swipe up to review additional services.
    Google Services screen
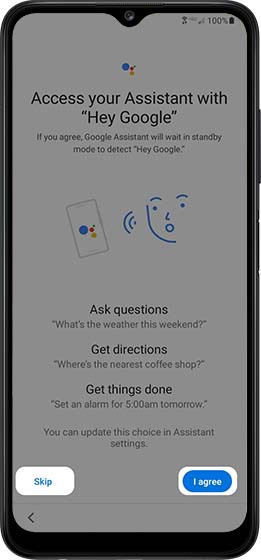
  11. From the 'Access your Assistant with Hey Google' screen, tap 'I agree' to set up Google Assistant or tap 'Skip'.
    Google Assistant screen
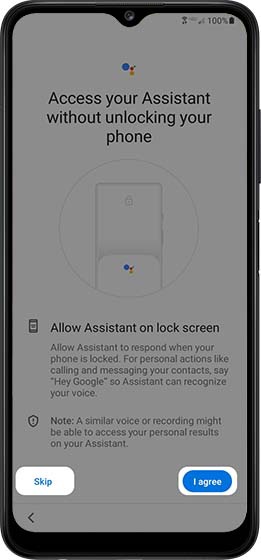
  12. From the 'Access your Assistant without unlocking your phone' screen, tap 'I agree' or 'Skip'.
    Access Google Assistant
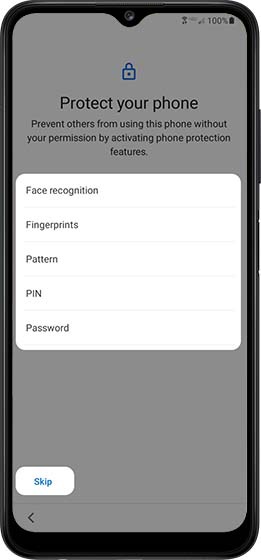
  13. From the 'Protect your phone' screen, select a protection option then follow the on-screen prompts.
    If you choose 'Skip', you can add a screen lock or set up face or fingerprint recognition after setup is complete.
    Protect your phone screen
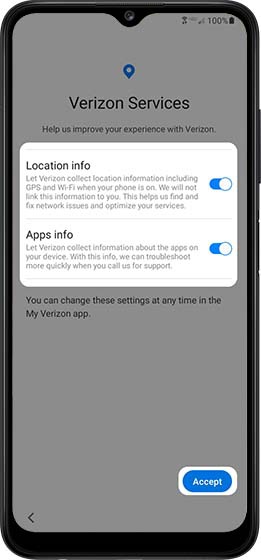
  14. From the 'Verizon Services' screen, tap the applicable switch(es) to turn the available options (e.g., Location info, Apps info) on or off then tap
    Accept
    .
    Verizon Services screen
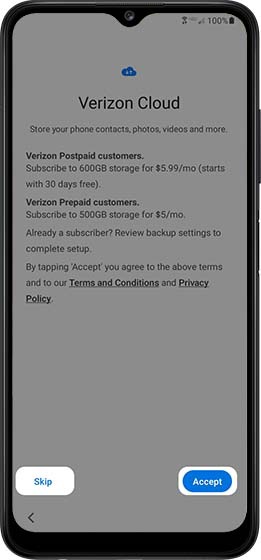
  15. From the 'Verizon Cloud' screen, review the info then tap
    Agree
    .
    If you choose 'Skip', you can set up Verizon Cloud after setup is complete.
    Verizon Cloud screen
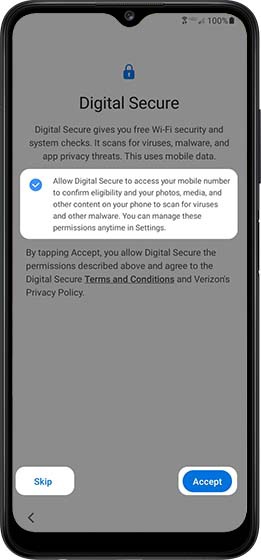
  16. From the 'Digital Secure' screen, review the info then tap
    Accept
    .
    If you choose 'Skip', you can change permissions after setup is complete.
    Digital Secure screen
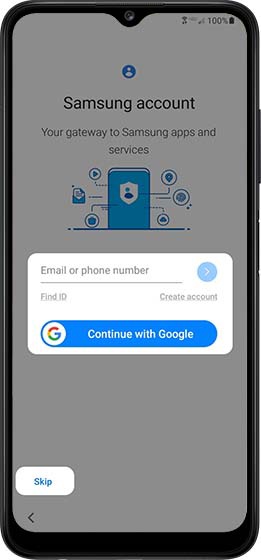
  17. From the 'Sign in to your Samsung account' screen, sign into your existing account, create a new Samsung account or select
    Continue with Google
    .
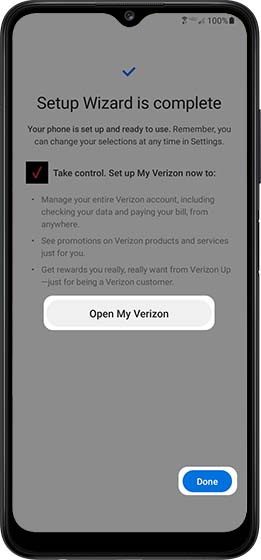
  18. Tap 'Open My Verizon' to set up the My Verizon app or tap 'Done' to exit the Setup Wizard.
    Setup Wizard complete screen


    My Second Blog Site- Click Here 

    please like Comment and share to all friends
    comment mai bataye aapko hamara notes aapko kaisa laga.notes releted koi bhi inquiry ke liye hamari email id par mail kare..
    Mujhe Instagram Aur Facebook par Follow Kare

    Thanks for Supporting


    My Instagram Id click here- INSTAGRAM

    My Facebook Page click here- FACEBOOK PAGE

    MY MOBILE NUMBER - 9990080678
     
    My Email Id :-  govind9990080678@gmail.com