Thursday, June 30, 2022

how to Block Site in Sophos Firewall


 Sophos Official Site


Step 1. Create a Custom Category with the keyword list

  1. Navigate to Protect | Web | Categories and click the Add button.
  2. Specify a NameClassification and add the keyword(s). I suggest adding some basic variations such as plurals and common language variations used in your organization.

Step 2. Create a Custom User Activity group

  1. Navigate to Protect | Web | User Activities and click the Add button.
  2. Specify a Name and add the custom Category created in the previous step.

Step 3. Create a new Web Policy

  1. Navigate to Protect | Web | Policies, click the Add Policy button and give the policy a name.
  2. Click the Add rule button and add a Block HTTP rule for the Custom User Activity created earlier
  3. Change the Default action rule to Allow HTTP (we will restrict this in the firewall rules)
  4. Since we are going to apply this rule to search engines, it is a good place to check Enforce Safe Search as an Additional Setting of the web policy.

Step 4. Create a Firewall Rule

To make all of this work we need a Firewall rule that matches Google searches and then applies our web policy.

  1. Navigate to Protect | Rules and Policies | Firewall Rules and click the Add Firewall Rule button.
  2. In the Destination Networks section, search for and add the Google domains.
  3. Under Security Features | Web Filtering section, select your Restricted Search policy that you created earlier as the Web policy.
  4. Check Block QUIC protocol (Why? See our article on How Google’s QUIC Protocol Impacts Network Security and Reporting).
  5. Check Use web proxy instead of DPI Engine (You need to use the Web proxy method since enforcing SafeSearch is not possible using the DPI engine).
  6. Check Decrypt HTTPS during web proxy filtering.

Testing

Now that you’ve created a Custom Category containing your keywords, used it in Web Policy that also enforces SafeSearch, and applied that policy to a firewall rule that kicks in for Google domains, it is time to test!

Open Google in your favorite browser and search for “wallpaper”. You’ll see that you are blocked:

Search for something else such as ‘higher education’ and you will see that it is allowed.

Finally, search for home improvements/wall covering and you will notice when you click through to those sites, you will be allowed access to pages that contain the keyword ‘wallpaper’.

Monitoring Search Terms

The key to knowing what keywords to block is to keep an eye on the sort of searches being performed. Fastvue Sophos Reporter makes it easy to report on and be alerted to suspicious searches, or all searches used in your organization. Since most web journeys start with a search, it is a good indicator of what a user’s intended browsing is.

  1. In Fastvue Sophos Reporter, go to Reports | Overview Report | Internet Usage
  2. Select your desired date range and click Run Report (or Schedule Report)
  3. Go to the Safeguarding | Search Terms section. By default, this shows Suspicious Searches, but you can show all of them by clicking the All Searches button.


To get started with Sophos , download the free 30-day trial.

Conclusion

Blocking content using just ‘keywords’ on their own has some limitations in both application and practicality, but can be extremely useful in specific circumstances, such as blocking searches, when used correctly in combination with other Sophos XG filtering mechanisms.

You can now apply the above process with other keywords to prevent specific situations in your organization, such as searches for ‘VPNs’ or ‘Bypass firewall’ that could potentially result in those pesky students (or employees!) getting around your Sophos rules and policies altogether.

Let us know how you’re using keyword blocks in the comments!


My Second Blog Site- Click Here 

please like Comment and share to all friends
comment mai bataye aapko hamara notes aapko kaisa laga.notes releted koi bhi inquiry ke liye hamari email id par mail kare..
Mujhe Instagram Aur Facebook par Follow Kare

Thanks for Supporting


My Instagram Id click here- INSTAGRAM

My Facebook Page click here- FACEBOOK PAGE

MY MOBILE NUMBER - 9990080678
 
My Email Id :-  govind9990080678@gmail.com


Tuesday, June 28, 2022

How to Setup Samsung Galaxy A03-Core Android Phone

         Please follow Setup By Setup.............

  1. Ensure a 4G SIM is inserted in the device prior to powering on.
    4G Devices purchased from Verizon include a pre-installed 5G SIM card.

  2. If powered off, press and hold the
    Power button
    (right edge, below the Volume buttons) until the Samsung Galaxy screen appears then release.
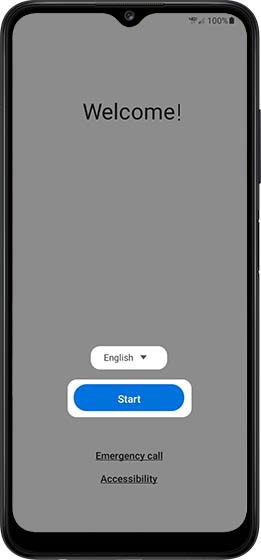
  3. Select the appropriate language then tap the
    Start
    .
    Let's go! screen
  4. To continue, select (check) the following then tap
    Next
    (lower-right):
    Review the info before continuing.
    Tap
    I have read and agree to all of the above
    to select all.
    Terms and Conditions screen
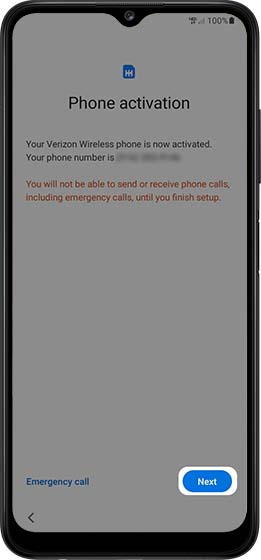
  5. From the 'Phone activation' screen, ensure the appropriate mobile number is listed then tap
    Next
    .
    If prompted, enter the account PIN then follow the onscreen prompts (see Account PIN FAQs for additional info).
    If activating a new phone, ensure the old phone is powered off.
    Phone activation screen
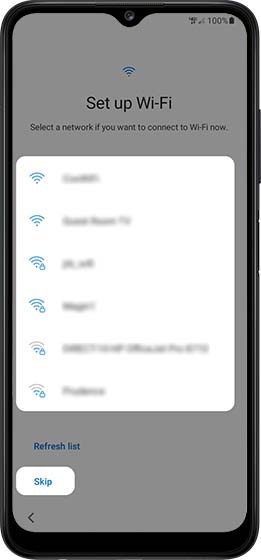
  6. From the 'Set up Wi-Fi' screen, select a network, enter the password when prompted then tap
    Next
    .
    If you choose 'Skip', you can add Wi-Fi networks after setup is complete.
    Set up Wi-Fi screen
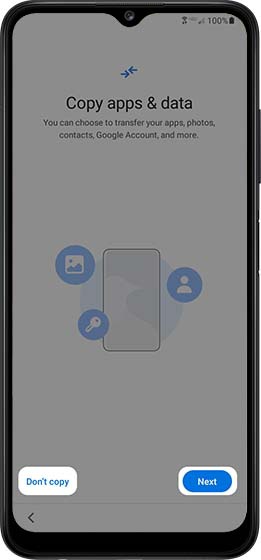
  7. From the 'Copy apps & data' screen, select the preferred option:
    • Next
    • Don't copy
      If troubleshooting, choose this option and don't restore the device until all testing has been completed.
    Copy apps & data
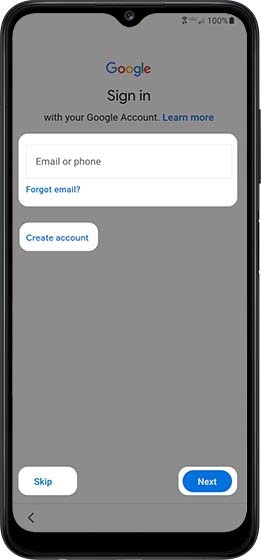
  8. From the 'Google Sign in' screen, sign in to your existing Google account or create a new one.
    If you choose 'Skip', you can add your Google account after setup is complete.
    Google sign-in screen
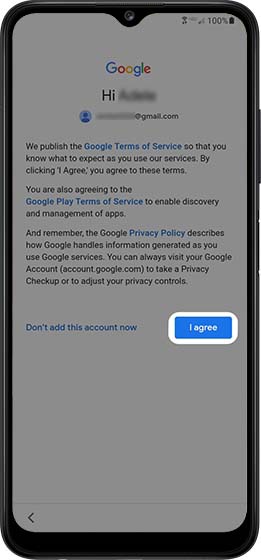
  9. Review the Google Terms of Service, Google Play Terms of Service, and Google Privacy Policy then tap
    I agree
    .
    Google T&C and Privacy Policy screen
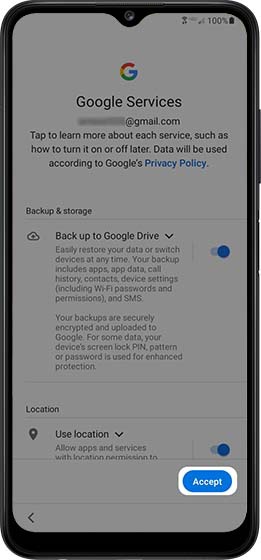
  10. From the 'Google Services' screen, tap the applicable switch(es) to turn on Switch on or off Switch off then tap
    Accept
    (lower-right).
    If necessary, swipe up to review additional services.
    Google Services screen
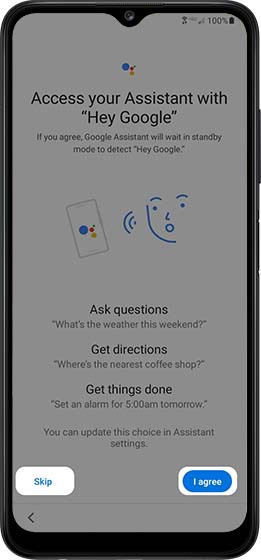
  11. From the 'Access your Assistant with Hey Google' screen, tap 'I agree' to set up Google Assistant or tap 'Skip'.
    Google Assistant screen
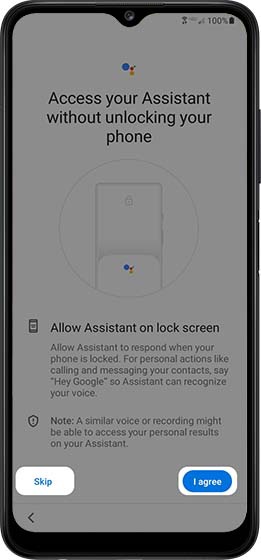
  12. From the 'Access your Assistant without unlocking your phone' screen, tap 'I agree' or 'Skip'.
    Access Google Assistant
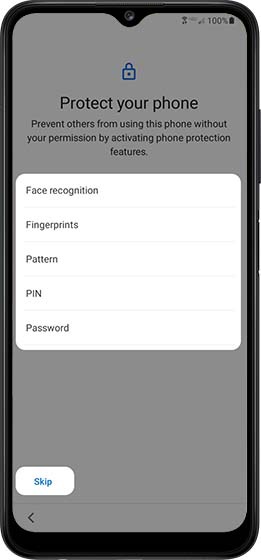
  13. From the 'Protect your phone' screen, select a protection option then follow the on-screen prompts.
    If you choose 'Skip', you can add a screen lock or set up face or fingerprint recognition after setup is complete.
    Protect your phone screen
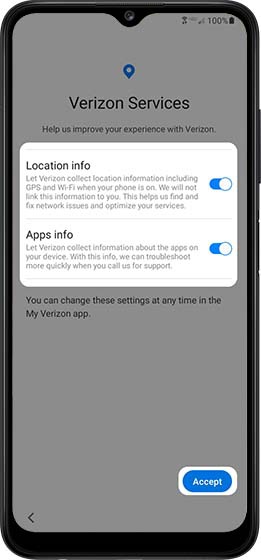
  14. From the 'Verizon Services' screen, tap the applicable switch(es) to turn the available options (e.g., Location info, Apps info) on or off then tap
    Accept
    .
    Verizon Services screen
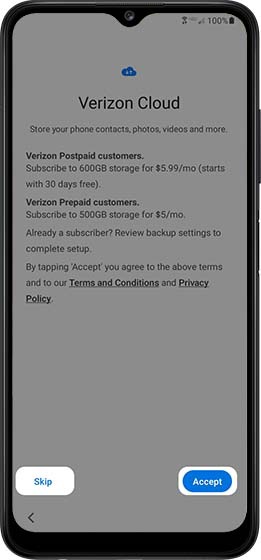
  15. From the 'Verizon Cloud' screen, review the info then tap
    Agree
    .
    If you choose 'Skip', you can set up Verizon Cloud after setup is complete.
    Verizon Cloud screen
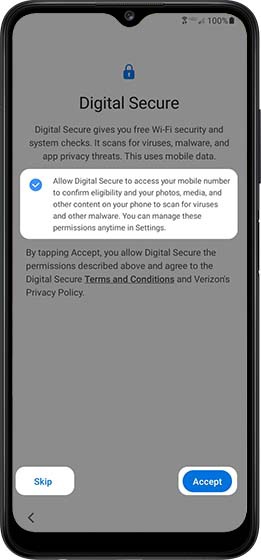
  16. From the 'Digital Secure' screen, review the info then tap
    Accept
    .
    If you choose 'Skip', you can change permissions after setup is complete.
    Digital Secure screen
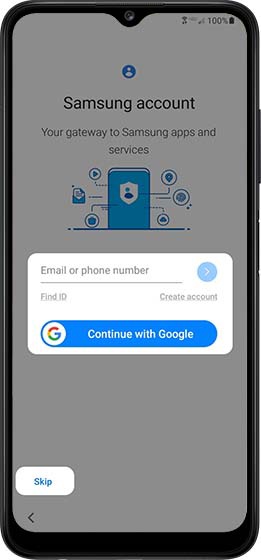
  17. From the 'Sign in to your Samsung account' screen, sign into your existing account, create a new Samsung account or select
    Continue with Google
    .
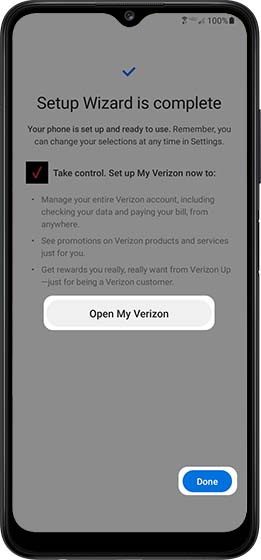
  18. Tap 'Open My Verizon' to set up the My Verizon app or tap 'Done' to exit the Setup Wizard.
    Setup Wizard complete screen


    My Second Blog Site- Click Here 

    please like Comment and share to all friends
    comment mai bataye aapko hamara notes aapko kaisa laga.notes releted koi bhi inquiry ke liye hamari email id par mail kare..
    Mujhe Instagram Aur Facebook par Follow Kare

    Thanks for Supporting


    My Instagram Id click here- INSTAGRAM

    My Facebook Page click here- FACEBOOK PAGE

    MY MOBILE NUMBER - 9990080678
     
    My Email Id :-  govind9990080678@gmail.com

Monday, June 27, 2022

How to create a Windows Seqrite Client packager in Server


To create a Windows Seqrite Client packager, follow these steps:

Open Server

Press Key Windows+R

Click on - All Programs


On the Seqrite Endpoint Security server, go to Start > Seqrite EPS Console > Client Packager

2. In Client Agent Packager list,select Custom.

3. If Minimal is selected, then the validity period check box is enabled, but other options on the page gets disabled. The validity period check box helps you to provide a stipulated number of days to use the installer. After the validity period, the installer expires.

4. The Minimal option is selected to send the Client Packager outside the organizational network through email. The Client Packager created with installer cannot be sent through email because of its huge size.

5. In OS platform select Windows.

6. Select the setup type (EXE/MSI) from Setup type list as per requirement.

7. Specify if you want to include antivirus setup in Client Packager by selecting Yes or No.

8. Click Browse to specify the folder path where you want to save Seqrite Client Packager.

9. Click Create and wait for a while, Client Packager will be created in the specified location.

10. Execute the Client packager on the Client systems where you wish to install Seqrite Clients.

copy Client Packager and install client PC..


My Second Blog Site- Click Here 

please like Comment and share to all friends
comment mai bataye aapko hamara notes aapko kaisa laga.notes releted koi bhi inquiry ke liye hamari email id par mail kare..
Mujhe Instagram Aur Facebook par Follow Kare

Thanks for Supporting


My Instagram Id click here- INSTAGRAM

My Facebook Page click here- FACEBOOK PAGE

MY MOBILE NUMBER - 9990080678
 
My Email Id :-  govind9990080678@gmail.com